GitHub Actions for perfect Python Continuous Integration
A simple GitHub action for formatting, linting, testing, and building a Python application
Feb 04, 2020

This is the third part in the perfect Python series. The first two parts are: How to set up a perfect Python project and A perfect way to Dockerize your Python application.
Once you have a project with some working code in it you ideally want to ensure the standards and quality are maintained during every change to the codebase.
One simple but powerful way to do this is host your code on GitHub and require pull requests for all changes. Pull requests allow discussion and review before the changes are merged into main. They also allow us to run jobs over the code using GitHub Actions.
There are many other solutions for continuous integration built directly into version control (GitLab CI/CD and BitBucket Pipelines being well known examples) but this article will focus on the most popular - GitHub Actions.
GitHub Actions
GitHub describes Actions as:
Automate your workflow from idea to production
GitHub Actions makes it easy to automate all your software workflows, now with world-class CI/CD. Build, test, and deploy your code right from GitHub. Make code reviews, branch management, and issue triaging work the way you want.
We are going to create a GitHub Action that runs two jobs:
- Format, lint and test the code - this ensures code quality
- Build the Docker image - this prepares the app for deployment
Code Quality GitHub Action
It's incredibly easy to create a GitHub Action, just add a yml file in the
.github/workflows/ directory in your repository. Let's dive straight in and
show a action that will check formatting, lint, and test every pull request and
push to our repository. This example uses pipenv, but of course you can replace
this with any tool/scripts you are using in your project:
# .github/workflows/test.yml

name: Test

on: [push, pull_request]

jobs:
  test:
    runs-on: ubuntu-latest
    steps:
      - uses: actions/checkout@v2

      - name: Setup Python
        uses: actions/setup-python@v1
        with:
          python-version: 3.7

      - name: Install dependencies with pipenv
        run: |
          pip install pipenv
          pipenv install --deploy --dev

      - run: pipenv run isort --recursive --diff
      - run: pipenv run black --check .
      - run: pipenv run flake8
      - run: pipenv run mypy
      - run: pipenv run pytest --cov --cov-fail-under=100
Let's step through this:
-
First name the action:
name: Test -
Next specify the events that will trigger the action. As mentioned above this will run on pushes and pull requests:
on: [push, pull_request] -
Now we list the jobs to run. In this case there is one job, with the id
testjobs: test: '...' -
Next specify the type of machine to run the action on. As well as
ubuntu-latestthere isubuntu-16.04,macos-latestandwindows-latest:runs-on: ubuntu-latestIf you are running your action on a private repo you will be charged for the time taken. it's important to note that Windows minutes cost 2x Linux minutes, and Mac minutes cost 10x!
-
Now we specify the steps to take on the job. The first step is to use an existing action to checkout the code.
steps:
  - uses: actions/checkout@v2
This action lives in a public repo on GitHub, but locally defined actions can also be used with paths:
uses: ./.github/actions/my-action. -
We can also name steps and provide arguments to the actions we use. Here, we are installing Python 3.7:
- name: Setup Python uses: actions/setup-python@v1 with: python-version: 3.7 -
We can run any commands we want using the operating system's shell. This installs the project dependencies using
pipenv:- name: Install dependencies with pipenv run: | pip install pipenv pipenv install --deploy --dev -
Finally we are ready to check the push or pull request meets the standards we require on our project. In this case we format the code using
isortandblack, lint the code withflake8andmypy, and test the code withpytest.- run: pipenv run isort --recursive --diff - run: pipenv run black --check . - run: pipenv run flake8 - run: pipenv run mypy - run: pipenv run pytest --cov --cov-fail-under=100
Docker build GitHub Action
Let's add a second job that will build our Docker image and perform a basic smoke test on it to ensure it runs:
jobs:
  ...

  docker-build:
    runs-on: ubuntu-latest
    steps:
      - uses: actions/checkout@v2

      - name: Build docker image
        run: docker build . -t project_name

      - name: Test image
        run: |
          docker run --rm -d --name test_container -p 8000:8000 project_name
          docker run --link test_container:test_container waisbrot/wait
          curl --fail http://localhost:8000
This job has only three steps:
-
Checkout the code as above.
- uses: actions/checkout@v2 -
Run the docker build command in the base directory of the project and tag the image.
- name: Build docker image run: docker build . -t project_name -
Test the image.
- name: Test image run: | docker run --rm -d --name test_container -p 8000:8000 project_name docker run --link test_container:test_container waisbrot/wait curl --fail http://localhost:8000- In this example the image runs a http server on port 8000, so we expose that port for testing.
- It takes a little while for the http server to startup within the container so we use a third party image to block until our container is accepting http connections on its exposed ports.
- Then do a simple http get to check everything is working.
Build Failure
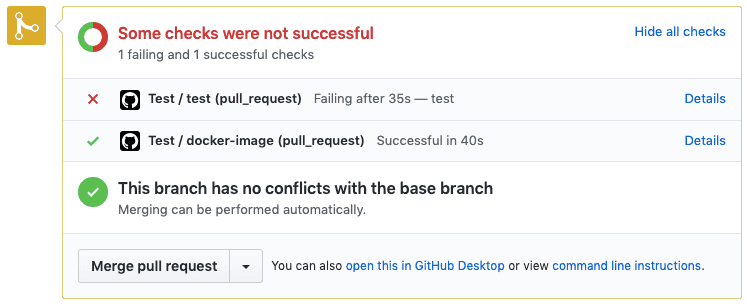
If any of the steps on a job fail (return a non-zero exit code) the job will be marked a failure and the pull request will indicate this:

If we enforce that all checks must pass before a pull request is merged we will gain a high degree of confidence in the quality of the code and in our ability to deploy whenever we need.
Next time - Continuous Deployment
Now that we have Continuous Integration running we can take it to the next level and use Continuous Deployment.
We will create a GitHub Action to deploy our Docker image with Kubernetes and Terraform.