Cloudy with a Chance of Python
Deploying a Python program as a Google Cloud Function
Jun 28, 2021

Google Cloud Functions is a serverless computing service offered by the Google Cloud Platform (GCP). Serverless computing is a cloud computing model where the cloud provider manages all the resource needs of a program. All that the developer has to do is to create and configure the cloud function and deploy the application code. See our blog here for a discussion of when to use cloud functions.
Let’s see how we can deploy a Python program as a Google Cloud Function to check what the weather is going to be like.
A Sample Python Program to Tell Us the Weather
Let's start by creating a simple Python application to obtain the current temperature of a specific location by querying the OpenWeatherMap API through the RapidAPI platform. We’re not going to go too much into the details on the functions themselves, but they're covered fairly in depth in their docs
main.py
from weather_info import weather
from format_data import format_weather

if __name__ == "__main__":
    weather_obj = weather.WeatherData(city="New York")
    weather_data = weather_obj.getweather()
    format_obj = format_weather.Format(data=weather_data)
    information = format_obj.format_json()
    print(information)
weather_info/weather.py
import requests


class WeatherData:
    def __init__(self, city):
        self.city_name = city

    def getweather(self):
        urlstring = "https://community-open-weather-map.p.rapidapi.com/find"
        querystring = {
            "q": f"{self.city_name}",
            "cnt": "1",
            "mode": "null",
            "type": "accurate",
            "units": "metric",
        }
        headers = {
            "x-rapidapi-key": "xxxxxxxxxxxxxxxxxxxxxxxxxxxxxxxxxxxxxxxxx",
            "x-rapidapi-host": "community-open-weather-map.p.rapidapi.com",
        }

        response = requests.get(url=urlstring, headers=headers, params=querystring)

        return response.json()
format_data/format_weather.py
from datetime import datetime


class Format:
    def __init__(self, data):
        self.weather_data = data

    def format_json(self):
        data = (
            f"{datetime.strftime(datetime.utcnow(), '%m-%d-%Y %H:%M:%S')} - "
            f"{self.weather_data['list'][0]['name']} - "
            f"{self.weather_data['list'][0]['main']['temp']} C"
        )

        return data
Running this program will give us an output with the current time and the temperature of the given city.
06-04-2021 21:26:33 - New York City - 18.65 C

Process finished with exit code 0
Finally, we’ll need to create a requirements.txt file including all the required packages for this application. The complete application with all the files will have the following file structure.
function/
├─ format_data/
│  ├─ __init__.py
│  ├─ format_weather.py
├─ weather_info/
│  ├─ __init__.py
│  ├─ weather.py
├─ main.py
requirements.txt
Configuring a Google Cloud Function
Before we can actually set up a Google Cloud Function, we need to have a Google Cloud Platform account. To get one go to Google Cloud and sign up. Google offers a Free tier for Google Cloud Functions with up to 2 million executions. After signing in with the GCP account, you can set up the project in a few steps.
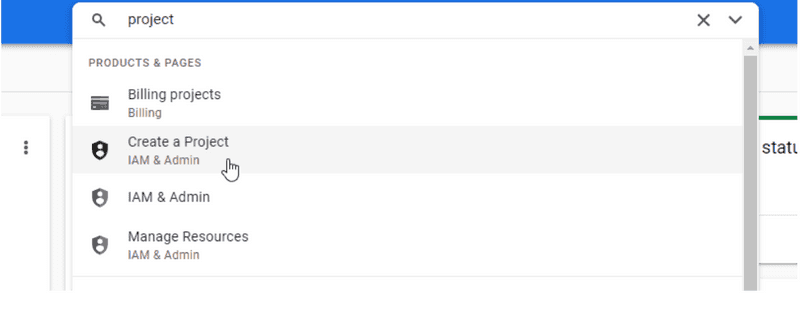
Step 1.1 - Search “Project” in the search bar of the GCP Dashboard and select “Create a Project” from the search results.
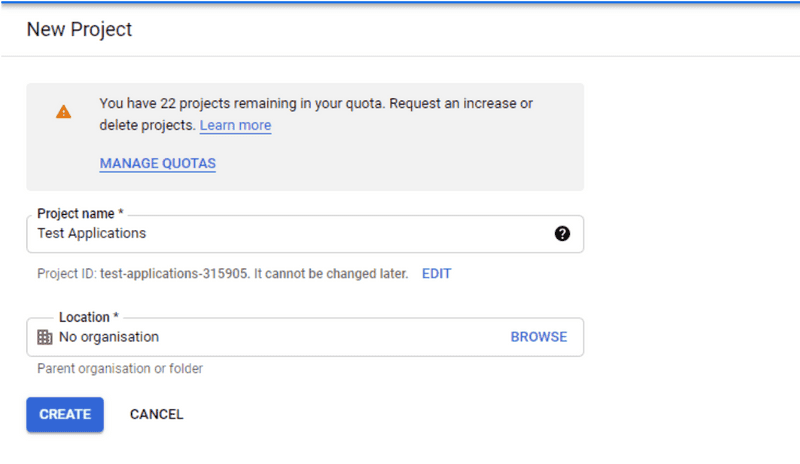
Step 1.2 - Choose a Project name and create the project. To keep things simple, we’ll name our project “Test Applications.”
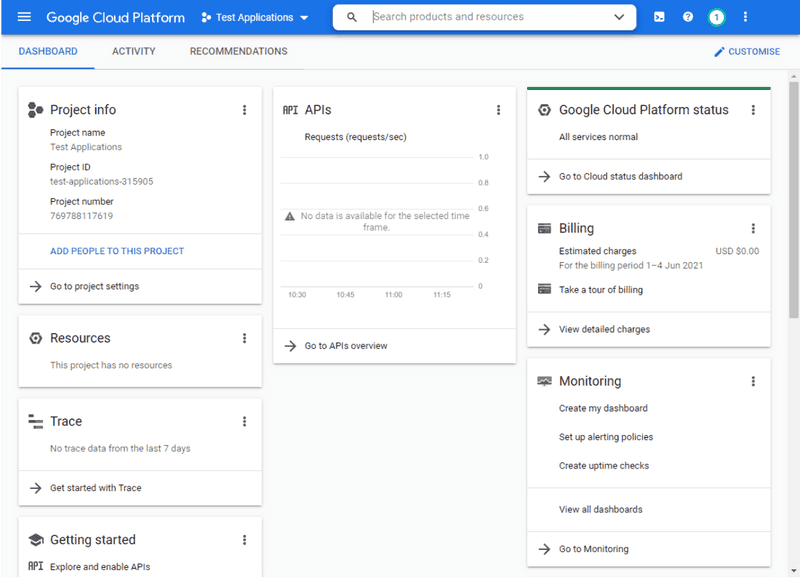
Step 1.3 - You’ll be directed to the Project dashboard.
Step 2 - Create the Cloud Function
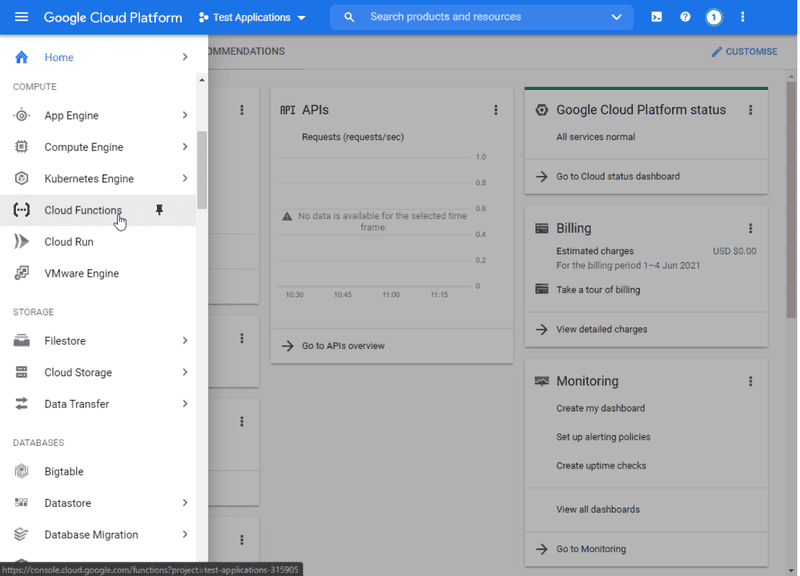
Step 2.1 - Select Cloud Functions from the navigation menu.
Step 2.2 - Click on the “Create Function” button to initialize the process of creating the new Cloud function.

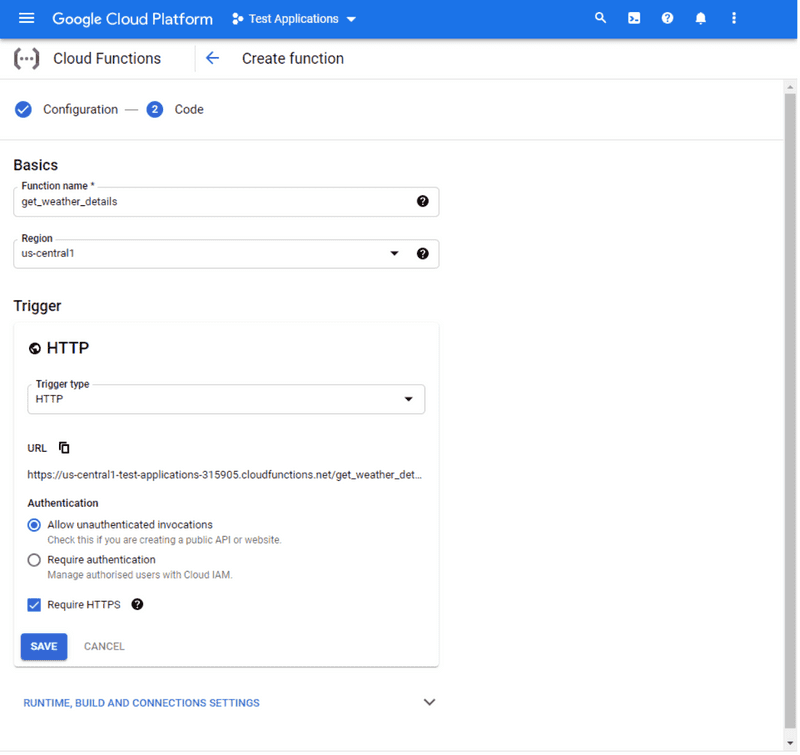
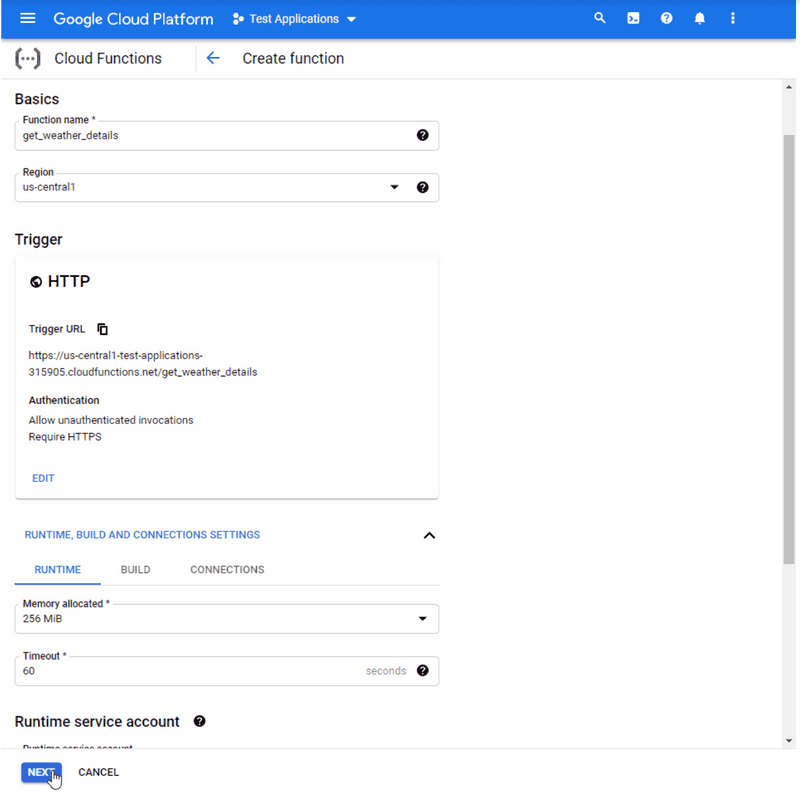
Step 2.3 - Fill in the necessary details in the “Create function” screen.
Primary Settings
-
Function name - Name of the function
-
Region - The GCP region to deploy the function. (If your program targets a specific geographic region it’s advisable to select a region closest to that desired location)
-
Trigger - This section sets up how the function will be executed. Configure all the required settings in the Trigger section and save them before continuing with any other configurations.
-
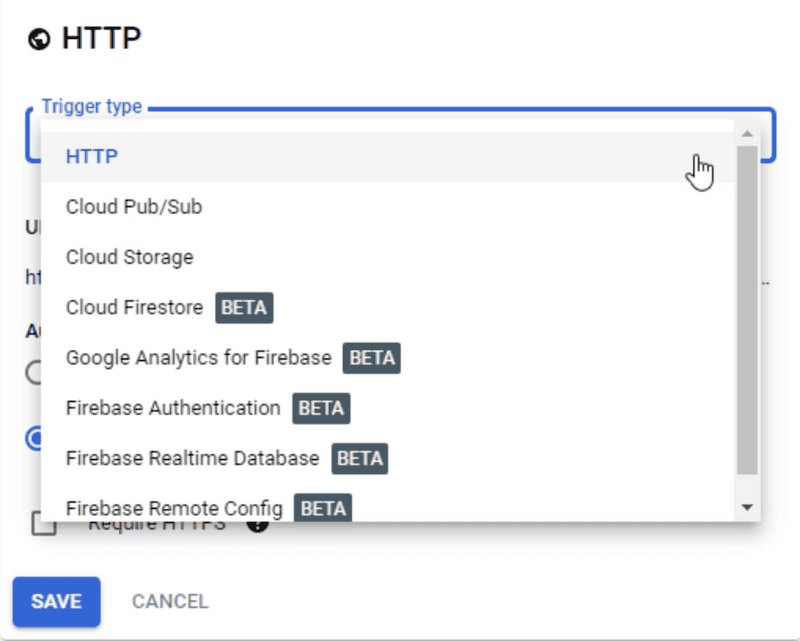
Trigger Type - GCP offers multiple ways to trigger the function, ranging from simple HTTP triggers to Pub/Sub message service, etc. For our function we’ll be using the HTTP trigger type. That way the function will trigger whenever anyone navigates to the right page in their browser.
-
Authentication - Configure the users who can trigger the function. We want anyone to be able to query the function and check out the temperature info for any location, so we’ll configure our "get_weather_details" function to allow unauthenticated invocations.
-
Require HTTPS - Make the HTTP trigger URL HTTPS
Runtime, Build, and Connection Settings
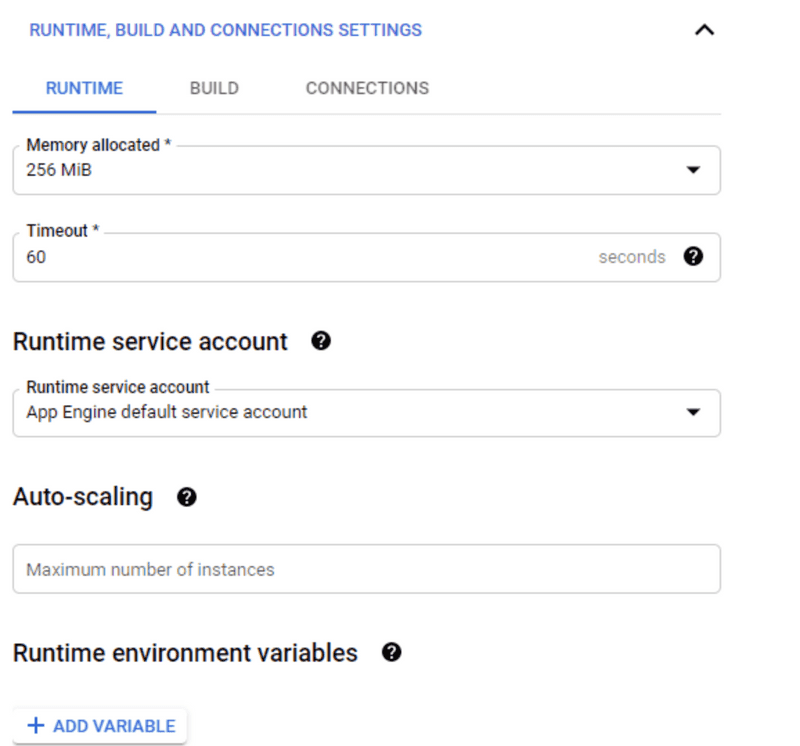
Runtime Settings - This indicates the settings that are used during the runtime
-
Memory allocated - The amount of allocated memory for the function
-
Timeout - Function timeout
-
Runtime service account - Service account to be used for authenticating and authorizing with other Google products. The service account will be considered as the identity of the Cloud Function.
-
Auto-scaling - Scaling settings such as the maximum number of instances to create.
-
Runtime environment variables - Environmental variables that can be used during the runtime of the function.
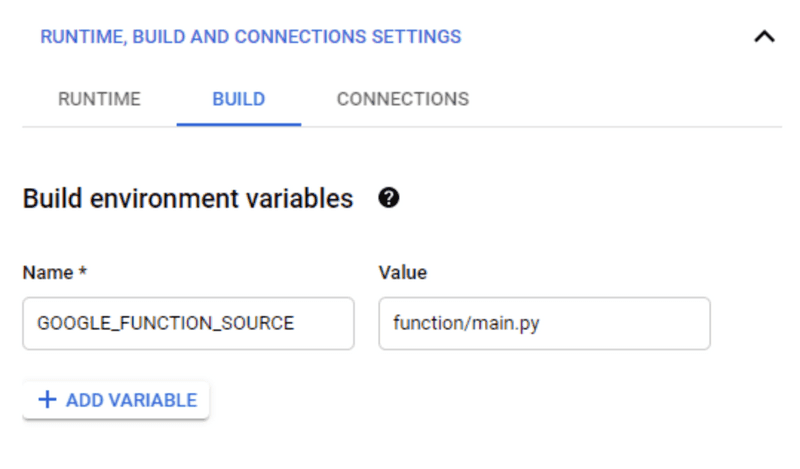
Build Setting - This can be used to configure any build-time variables. We’ve added the GOOGLE_FUNCTION_SOURCE variable to indicate the entry point file for the program. (main.py)
Connections setting - This section allows setting configurations of Ingress and Egress traffic to the function. For our program, we’re allowing any traffic from the internet to reach the function.

Step 2.4 - Once all your configurations are set, click “Next” to upload the code.
Step 3 - Configure your Python Application to run as a Google Cloud Function
Step 3.1 - Code Modification
Before uploading the application code, we’re going to need to make a small
modification to the function. We configured the __name__ variable in our
main.py file to indicate the primary execution code block. Cloud functions
don't use this, and won’t recognize this __name__ = “main” as the entry point.
To address this we’ll remove the __name__ block and replace it with a
function.
Another change we have to make is to accept an input variable so that users can choose the city that they’re interested in. We’ll configure the function to accept JSON values and return the temperature details of the provided city.
main.py
def main(request):
    content_type = request.headers["content-type"]
    if content_type == "application/json":
        request_json = request.get_json(silent=True)
        if request_json and "city" in request_json:
            target_city = request_json["city"]
            weather_obj = weather.WeatherData(city=target_city)
            weather_data = weather_obj.getweather()
            format_obj = format_weather.Format(data=weather_data)
            information = format_obj.format_json()
            return information
        else:
            raise ValueError("JSON is invalid, or missing a 'city' property")
Step 3.2 - Create a Zip file including the function folder and requirements.txt file. (We created cloud_function.zip)
Step 3.3 - Select the appropriate Runtime (Python 3.8) in the Code section and set up the Entry point (In our case, this is the main function we created earlier)

Step 3.4 - Select the “ZIP upload” option in the Source code section as we have created a zip file.
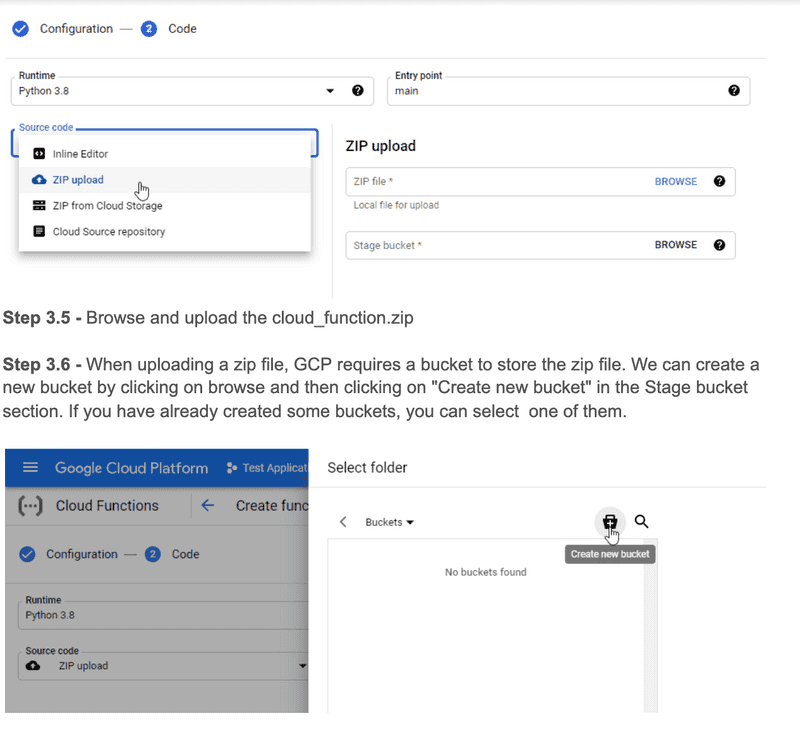
Step 3.5 - Browse and upload the cloud_function.zip
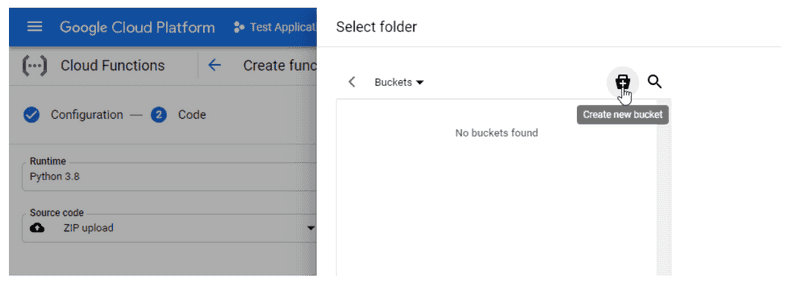
Step 3.6 - When uploading a zip file, GCP requires a bucket to store the zip file. We can create a new bucket by clicking on browse and then clicking on "Create new bucket" in the Stage bucket section. If you have already created some buckets, you can select one of them.
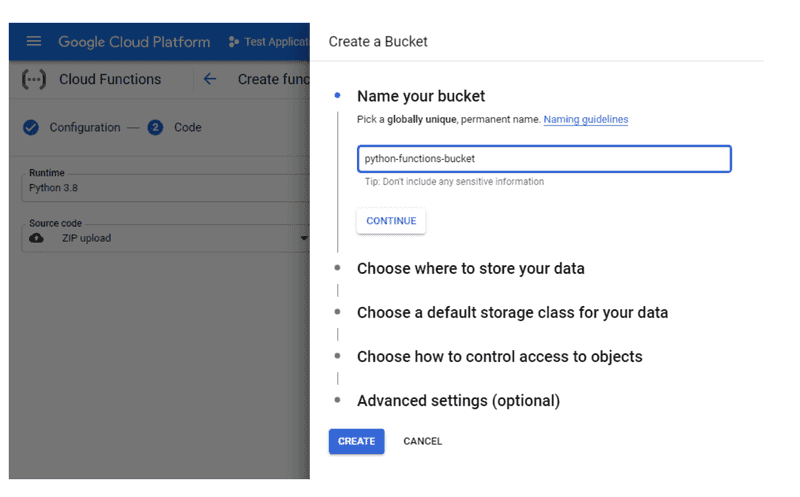
Create a new bucket in the bucket creation screen by entering a bucket name and configuring any additional settings.
Step 3.7 - Now that our configurations are all set, we can click on the Deploy button to deploy the cloud function.
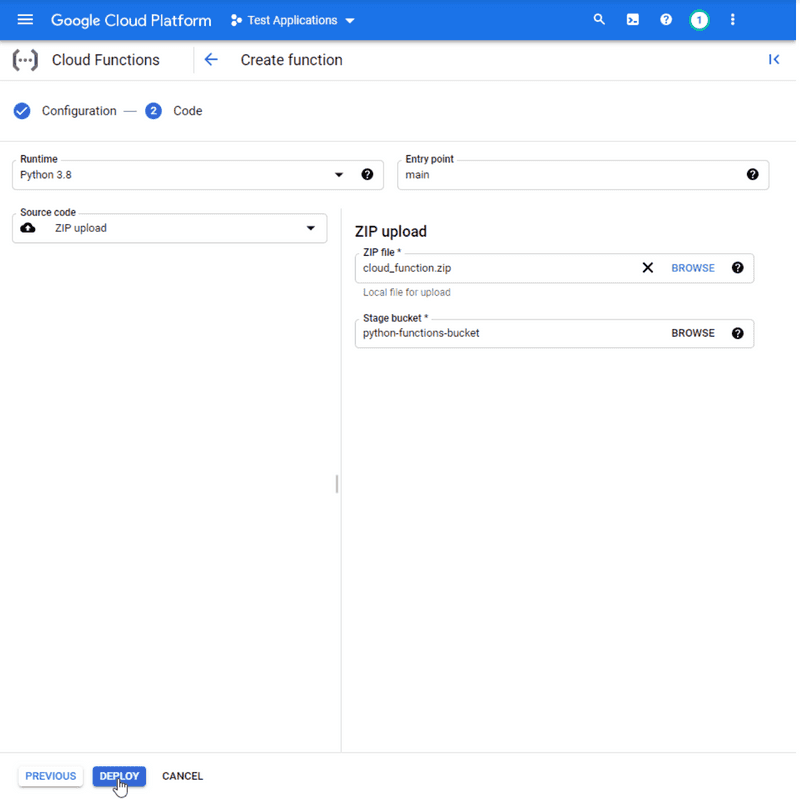
Step 3.8 - If we set up all the configurations correctly then the cloud function will be successfully deployed.

Step 4 - Test the function.
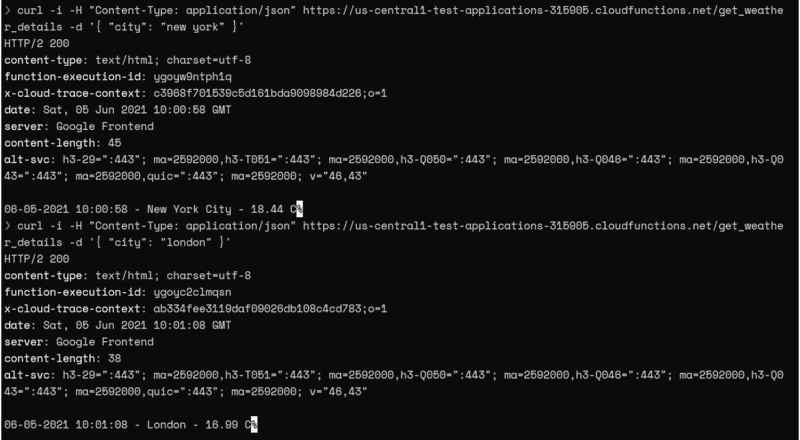
Let's test the Cloud function now that it’s deployed. We can make some CURL requests to verify if the function is working as expected.
curl -i -H "Content-Type: application/json"
https://us-central1-test-applications-315905.cloudfunctions.net/get_weather_details -d '{ "city": "<city name>" }'
Results
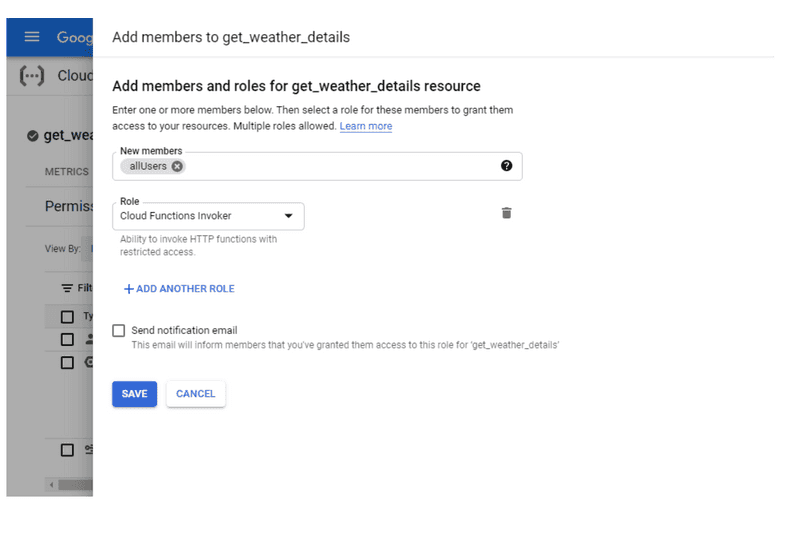
NOTE - If we run into authentication issues, we can change the user permissions of the “get_weather_details” function since it is a publicly accessible function. To do that, simply go to the permissions section of the cloud function and add a new permission.
We will be using the “allUsers” as the member of the “Cloud Function Invoker” role to allow anyone to invoke the cloud function.
Conclusion
We’ve covered how to deploy a simple Python program as a Google Cloud Function and allow anyone to run it. Cloud functions enable easy deployment of programs without having to worry about the details of the underlying infrastructure. They’re ideal solutions for backend services, microservices, or any functions that require rapid or scheduled executions.